I was searching through crochet beret patterns looking for something special, and a particular image caught my eye. It was a lovely-looking flower-patterned beret.
The pattern was called ‘Starburst Beret’ from BHooked Crochet. So I clicked on the link, and I found a free pattern and an excellent video tutorial.

I started a beret with some blue yarn first from a stash I got from an Opportunity Shop, and when I’d almost finished, I ran out of yarn!
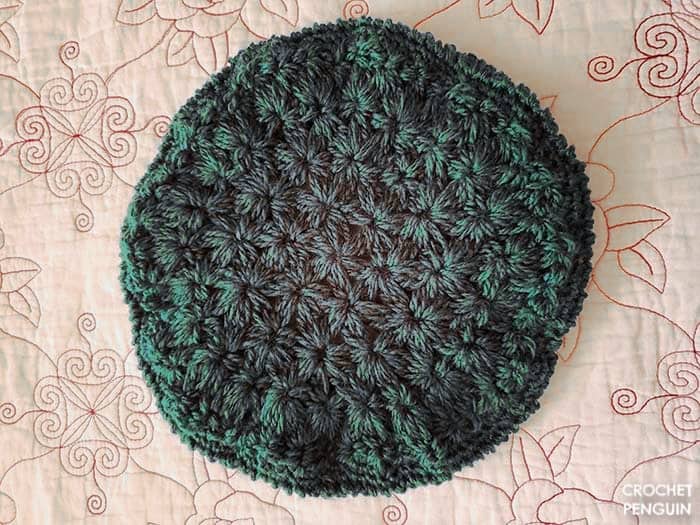
I tried again with the green yarn, and luckily I had enough to finish the beret.
The yarn I used was relatively soft but a little scratchy, but not unbearably so. I love the color, a dark forest green.
With the yarn being from a charity shop, there were no details about what yarn it was, so I can’t give more information about it.

The pattern by Brittany of BHooked Crochet suggested 1 skein of Manos del Uruguay Maxima or approximately 160 yards worsted weight yarn.
The pattern was classified ‘Experienced,’ but I found it relatively easy. If you’ve done several crochet projects, I think you’ll find this pattern good fun. It’s not suitable for beginners.
The pattern was made up of jasmine stitches, single crochets, reverse single crochets, and post stitches.

There’s a video for left-handers and right-handers, which is excellent, so if you are leftie and need a bit of help with the beret, the video for left-handed crocheters would be very helpful for you.
The first step was starting the flower part of the beret, which took a while.
I used the video for the whole process, which made it easier because it showed you how to do the stitch rather than just telling you.
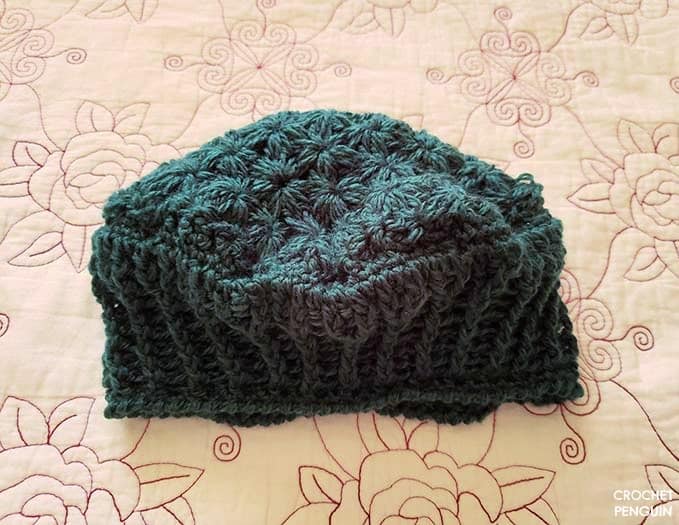
I moved onto the beret’s ribbed band, which was made up of front and back post stitches. Then I did the last step, a reverse single crochet border.

I especially loved Brittany’s tips on how to block the beret when you completed it. She said to put the beret on a dinner plate, wet it, then leave it to dry. My beret turned out much neater and round once it had dried.
I love this beret. The jasmine stitch is very beautiful, and the ribbed band gives it a nice stretch, so it fits over your head. I believe you can wear it on both sides. Even the wrong side is pretty!

All in all, I loved how my beret turned out! If you’re thinking about crocheting a beret, I highly recommend this pattern.
Want to see another project I’ve worked on? See here.
Pin Now to Save for Later

How do I open the pattern, I don’t do Pinterest.
Hi Carolyn, here is a link to the pattern on the B.Hooked blog. It contains the written instructions as well as a video tutorial. Hope this helps, and hope you enjoy making it! Cheers Jodie
Beautiful, I’m going to make one for my daughter. Thank you for sharing!
Hi Lisa, I’m sure your daughter will love it. It’s such a gorgeous pattern!
So excited to make this! I have also been looking for a new beret pattern… They’re great for when the weather is just a bit chilly, but not cold enough for a full beanie. Thanks for the link!!
Hi Jen, glad to hear you’re inspired to make it. I couldn’t agree more. Happy crocheting!
Hi Jodie! Love the Starburst Beret pattern. Will definitely work it for myself!!! I don’t do that often. I have crocheted since I was a teenager. Love the craft and am trying out new techniques and patterns. Thought I’d have more time to work at it, but a certain little boy (my grandson) keeps me busy. Thanks for the pattern
Suzanne Bernocco
Hi Suzanne. Thanks so much for sharing your experiences of crochet. All the best with your own beret when you get the chance. Cheers Jodie